Thankfully Samsung have not gotten into the habit of locking their bootloaders, so this should be a fairly straightforward and low risk proposition.
Firstly I'd like to thank Chainfire for doing all the hard work here. He not only developed a root method and customised CWM to work with the S3, but he also wrote a pretty easy to follow guide that you can find here at XDA Forums.
As usual everything detailed here is at your own risk, we can't be held responsible for anything you do to your device. You need to be aware that there is a real risk of bricking your device, especially if you do not follow instructions exactly.
You will possibly void the warranty on your device by increasing the flash counter, thankfully Chainfire is planning to update his TriangleAway app within the next few days to remedy this and we will likely be posting a guide on restoring your Samsung Galaxy S3 to stock. [UPDATE: Chainfire has now released an undated version of Triangle Away on the Play Store, so resetting your flash counter is now utterly simples - grab it from here].
Hit us up after the break for our detailed guide with lots of screen grabs to help you along the way (and look out for our video guide on the blogs YouTube channel tomorrow if you feel like you need even more hand-holding).
[If you don't presently own an S III, but have somehow found yourself here you might like to check out the first part of our AndroidNZ S III review here instead of clicking through to the guide]
Updated guide:
As if this wasn't easy enough already, Chainfire released a new single-flash method to Root your Galaxy S III, here's our updated guide for the new, friendlier method:
Preparation
Here is a list of things you will need:- A fully charged Galaxy S3
- A micro USB connection cable
- A Windows PC
- An internet connection (for downloading the files needed)
If you simply connect the Galaxy S3 to the PC with the micro USB cable it will install them.
To be very sure your device will be recognised by Odin connect twice - once with USB debugging enabled, and once without - different drivers are installed depending on the status of debugging.
You can enable USB Debugging by going to Settings --> Developer Options and select USB debugging as shown in the screenshot below (blank box means it is not enabled)
If you're still not having any luck then try downloading the latest version of Samsung's Kies software by going here and following the steps below.
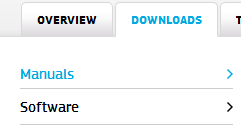
- Click Software so that the Kies download becomes visible
- Click the icon highlighted below to download Kies.
You may then install Kies afterwards and connect your phone, but remember to close Kies after the drivers have completed installing as it may interfere with the rooting process further on.
- Go here and here and download the attached files.
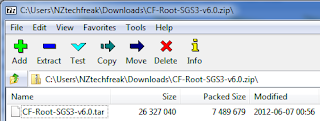
- Using your favourite zip program extract the file inside the CF-Root-SGS3-v6.0.zip
- You should be left with a .tar file as shown below
- Now to extract Odin3 follow the same process and you should see the executable file as shown below
- Disconnect your phone from the PC by removing the USB cable you plugged in earlier. Make sure Kies is also closed before continuing
- Run the Odin3 exe file and you should see a screen as follows
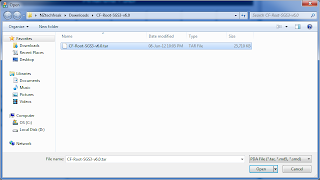
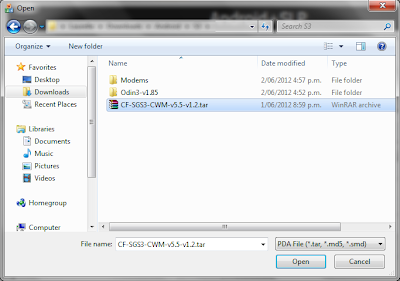
- Click the button labelled PDA and then browse to where you extracted the CF-Root.tar file. Click Open
- Now comes the tricky part, getting your phone into Download mode. Turn your phone off and wait until you are sure it is completely off, it should vibrate to signal this. Now hold down the Volume Down + Home + Power Buttons. You will likely see a screen that says Warning!! press volume up to continue.
- The two screens should look similar to the ones below that are for the Galaxy S2:
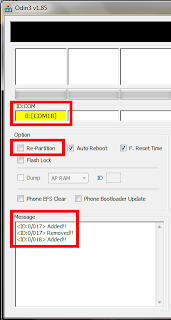
- Now plug the USB cable back in . If the drivers haven't been installed, wait until they automatically install. Once installed Odin should display messages similar to those in the image below. Make sure Repartition is not checked as per the screenshot
- Click Start button
- Now wait and your phone will be flashed with CF-Root and will automatically reboot. If Odin was successful you should see this:
- Congratulations you are now Rooted, and also have CWM Recovery and the CWM Recovery application installed - you're done!




Returning your Galaxy S III to stock
This is very straightforward really, first you'll need to reset your flash counter.
Download Chainfire's app Triangle Away from the Play Store and simply run the program. From within the app select the option to reset the flash counter, clicking that and acknowledging a few other things (like for instance that you are actually running the app from an S III) will take you to this screen:
Following the onscreen instructions and pressing volume up resets your flash counter, and you can verify this by booting into download mode. If you do that you'll be greeted with the following screen:
Once you've done that, head to this thread at XDA and download the stock firmware that corresponds to your S IIIs point of origin, extract it to a .tar file like we did above for Chainfire's CWM recovery install, and then flash the .tar file as PDA in Odin, just as we did before. Viola! Your S III now looks completely minty fresh and unadulterated for the service centre people if you needed to return it for warranty-related issues.
What follows is the deprecated guide, use the above guide if you have not yet Rooted your S III. If you've already Rooted with this older guide you have nothing to fear, apart from being easier to apply there is no particular advantage to the new method and you don't need to re-apply Root with it or anything like that - relax, you're already done!
Video Guide:
Preparation
Here is a list of things you will need:- A fully charged Galaxy S3
- A micro USB connection cable
- A Windows PC
- An internet connection (for downloading the files needed)
If you simply connect the Galaxy S3 to the PC with the micro USB cable it will install them.
To be very sure your device will be recognised by Odin connect twice - once with USB debugging enabled, and once without - different drivers are installed depending on the status of debugging.
You can enable USB Debugging by going to Settings --> Developer Options and select USB debugging as shown in the screenshot below (blank box means it is not enabled)
If you're still not having any luck then try downloading the latest version of Samsung's Kies software by going here and following the steps below.
- Click Software so that the Kies download becomes visible
- Click the icon highlighted below to download Kies.
You may then install Kies afterwards and connect your phone, but remember to close Kies after the drivers have completed installing as it may interfere with the rooting process further on.
Installing ClockWorkMod Recovery
- Go here and scroll down to Attached Files.
- Click to download the latest version of the CWM Zip with naming format CF-SGS3-CWM-vX.X-vY.Y (As of writing this was CF-SGS3-CWM-v5.5-v1.2.zip)
- Click to download Odin3 V1.85
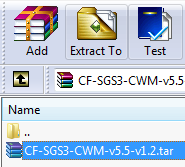
- Using your favourite zip program extract the file inside the CF-SGS3-CWM-vX.X-vY.Y Zip
- You should be left with a .tar file as shown below
- Now to extract Odin3 follow the same process and you should see the executable file as shown below
- Disconnect your phone from the PC by removing the USB cable you plugged in earlier. Make sure Kies is also closed before continuing
- Run the Odin3 exe file and you should see a screen as follows
- Click the button labelled PDA and then browse to where you extracted the CWM .tar file. Click Open
- Now comes the tricky part, getting your phone into Download mode. Turn your phone off and wait until you are sure it is completely off, it should vibrate to signal this. Now hold down the Volume Down + Home + Power Buttons. You will likely see a screen that says Warning!! press volume up to continue.
- The two screens should look similar to the ones below that are for the Galaxy S2:
- Now plug the USB cable back in . If the drivers haven't been installed, wait until they automatically install. Once installed Odin should display messages similar to those in the image below. Make sure Repartition is not checked as per the screenshot
- Click Start button
- Now wait and your phone will be flashed with CWM and will automatically reboot. If Odin was successful you should see this:
- Congratulations you have now installed ClockWorkMod Recovery on your Samsung Galaxy S3. Now read on to find out how to gain root access on your device.




Rooting
- Go to the SuperSU thread on XDA and scroll down to Attached Files
- Click the link to download CWM SuperSU
- Copy the file to the internal SD card of your Samsung Galaxy S3
- Now you get to learn how to reboot into Recovery mode on your device. First turn the device off and wait for it to vibrate
- Now hold Volume Up+ Home + Power, release the power button after about one second or when the Samsung Galaxy SIII logo appears on the screen.
- Now you are in ClockWorkMod Recovery, you can navigate up and down using the volume buttons and use power/home button to select, press back to go back.
- Scroll down to install zip from sdcard and press home
- If choose zip from scard is highlighted press home, otherwise scroll until it is highlighted
- Scroll down to the folder where you placed the SuperSU zip file earlier and press home
- Now scroll to the CWM-SuperSU-v0.zip and press home
- Scroll down to Yes - Install CWM-SuperSU-v0.zip and press home
- At this point some messages will appear on the screen and you should see one saying Install from sdcard complete
- Now scroll to *******Go Back******* press Home and repeat until reboot system now is highlighted
- Press home on reboot system now to reboot your device
- Now to confirm that you indeed have root access once your device has rebooted successfully
- Go to your app drawer and find the SuperSU icon as shown below

- Once loaded select Settings and you should see that Enable Superuser is ticked
Now that your Galaxy S3 is rooted you are free to use Root apps such as Mobile Odin, Titanium Backup, Adfree, and Sixaxis Controller. Make sure to perform the usual backups, including your EFS folder (if that sounds like a foreign language here is our guide to backing up your Rooted Android phone).




Great guide, although there is a thing that you should say, regarding the rooting process.
ReplyDeleteYou should say: "Copy the file to your Samsung Galaxy S3 INTERNAL SD CARD"
As some might think putting it in the EXT SD is fine.
Other than that brilliant guide!
I'de like to ask however - what about the backup of the S3 - it's done after flashing CWM, via nandroid recovery? or is it done some other way?
Cheers
Good point, will ammend that.
DeleteNandroid from within CWM recovery should be fine, CWM manager is not yet ported.
Thanks, I've updated it to say internal SD card.
DeleteRegarding backup, feel free to create a backup using CWM if that suits you. I prefer just to use Titanium Backup and restore non system apps after flashing a new rom or performing a factory reset. In some cases it may pay to use both as per the guide here: http://www.androidnz.net/2011/10/at-your-own-risk-how-to-backup-your.html
Many thanks for the fast replies lads!
DeleteMy question really is due to the backup that is "needed" - people are saying that the backup is around 1-2GB - my question really is this:
Do we backup before flashing anything, if so how?
Although this question seems a little "nooby" coming from me, but it's not at all explained or said, when or how we backup. Most flashers know how to backup AFTER flashing CWM, but is that really the point? As I thought one would want to backup the factory default, rather than an already modded kernel.
As backing up after flashing is pretty dead simple via nandroid/CWM - TB has nothing to do with backing up the ROM etc - only apps, and system data.
I have TB backups with my TB Pro account on my S1, and will be trying to see if they will be "picked up" on my S3, when it comes in.
You can't backup before flashing the modified kernel in any case, but the reason you want a backup even with the modified kernel is so that you can return to that *working* state if you flash another ROM and strike issues. Restoring from a NANDROID is easier than flashing back to a stock ROM, re-Rooting, then restoring all your apps and data with Titanium. Becomes a one step process to return to your old setup. The size of S3 backups is definitely a bit of an issue though, for sure.
DeleteYou'll be able to restore from your old TB backups onto your Rooted S3, just make sure to avoid restoring any settings or system elements, only apps and their data.
Ah well, that makes sense.
DeleteJust a typical nandroid backup then, just like on the S1. I just thought, possibly we could backup before modifying any sort of data.
As for the backup, did you have any problems backing it up to the EXTSD?
And if not, then could you restore from the EXTSD directly?
These questions wouldn't be asked if Samsung had delivered the blue version...
So apologies for something that might seem obvious whilst you have the phone, but possibly helpful for those that don;t feel confident with all of this too :)!
According to Chainfire's post his latest version of CWM recovery will allow use of the external SD card.
DeleteThat's great news!
DeleteGood video too btw :)
I miss the "install from sd card" in ClockWorkMod ?... What to do? ..
ReplyDeletethis is a fantastic guide, wish i had found it first before rooting my phone! i did it from the xda guide, but seeing these SS's makes me feel more confident i did it correctly
ReplyDeletegreat stuff
Thanks guys well written, can't belive what I can do to my SGS3 now lol, can you maybe give us a run down on what bloatware we can get rid of and especially stuff that obtains to NZ carriers in your next "how to" guide
ReplyDeleteYeah might need some investigating as I think only Telecom NZ add their own bloatware. Vodafone and 2Degrees seem to have left things fairly bare.
DeleteAn article on freezing or removing stock bloatware sounds like a good idea though
Telecom has the i9300T with only 2 extra programs, Y! TWorld and Your Telecom. It is not sim locked either. Chainfires root process with Clockwork Mod works but Triangle Away doesn't work yet. Chainfires thread says he will adapt it soon.
DeleteDo you know if it possible to load the S3 with something like stock ICS as run on the Galaxy Nexus? I would like to get rid of the Samsung bloat and just run pure Android.
ReplyDeleteIt will be in time, yes.
DeleteI find the naming of the various Skins and ROMs on XDA hard to figure out. A guide on what means what would be handy!
DeleteExcellent guide - worked like a charm. I'm now a proud owner of a rooted S3 - only two days old!
ReplyDeleteThanks Murray
ReplyDeleteOwned 2 hours and now have root!
Blakamin
Awesome!
Deletewhats the difference between v6.0,v6.1 dan v6.2? does it all works on sgsiii?
ReplyDeleteUse whichever is the most up to date one.
DeleteAnyone have a link to a stock rom for NZ?
ReplyDeleteMarcus
Okay so I found the Vodafone stock ROM
ReplyDeletehttp://www.samsdroid.com/2012/06/i9300xxale8-android-404-ics-new-zealand.html
But my SIII is from 2degrees and has a different CSC, does this matter when it comes to warranty?
Can these same methods and programs be used on the versions of the S3 coming to America? Thanks.
ReplyDeletehi everyone
ReplyDeletei'm new to the android world and i just bought my galaxy s3 3 days ago
i'm trying since yesterday to install the play station 1 games and play them but they didn't start, a black screan appear and it retains to the preview page i followed the guids from youtube i dounlouded the psx4droid + scph1001 bios+ games emulators and it wont open
i have an important Q , is it needed to root the phone in order to play the play station games? because i didnt rooted it i download every thing with the stock spec.
Try playing without the BIOS with the software GPU plugin. Instead of selecting a bios hit back, it will ask which ROM to load, hit back again and you should be on a white "about FPse" screen - hit menu there and go down to the misc options and download the OpenGL plugin. When it downloads activate it by selecting the software GPU plugin and exit FPse. Restart and hit back to dismiss the bios pop-up and then load the game.
DeleteDefinitely no Root required.
DeleteGreat guide! Successfully rooted my S3 :) But after a few hours, it is prompting a software update but I've canceled it. Is it safe to update?
ReplyDeleteHow long does it usually take from starting Odin on the pc? Ive been waiting for about 15 minutes and didn't know whether to leave it or reset it? It's just stuck on SetupConnection.. I'm scared..
ReplyDeleteI have the same problem.. help us please :)
DeleteProblem solved (Sorry for my english)
DeleteThe first time i used the original galaxy s3's cable and i was stucked to "Setupconnection". Today i've tried with a normal cable aftermarket(a common one from micro usb to usb) and the operation works. So try to use another cable :)
I just attempted this with my North American version of my SIII and it has bricked my phone. All I get is a brief Samsung logo and then it shuts off.
ReplyDeleteJust boot up in Download mode and reflash with Odin. Make sure you get the right Firmware for your area.
DeleteI managed to get this done! Booting into download mode took some playing around with but I finally found a version of the Rogers firmware which solved the problem.
Deletehey... I am using android for the first time. and I have bought a new galaxy s3.. I am tempted to root my phone. but before doing that i want to know whether rooting would void the warranty of my phone... and if i root my phone then can i get it back to the original version so as to avoid getting my warranty voided.... kindly reply asap....
ReplyDeleteRooting does void warranty, but it is possible to return it to a stock state for warranty purposes - the guide has stuff on that (make sure there is a stock firmware available at XDA on the link provided first).
Deletethanks for the reply...
Deleteplz... post in the link to the firmware too....and has anyone verified the same procedure ???
very nice tuto...................... thnx
ReplyDeleteThanks for the tutorial, I've had an SGSII for a year and never rooted it, then over the weekend I read some of your posts here and on Head-Fi, bought an SGSIII and just finished rooting it. I'm performing a backup in CWM as we speak! Thanks for the easy to follow guide.
ReplyDeleteIncidentally it looks like the reason I never succeeded before was because I didn't have the latest version of Java, so if anyone reading this has never managed to get Kies to come up, update your Java version!
Also re rooting/romming your handset: I work at a telco and deal with questions about this sort of thing all the time. The word I've received back from our repair centre is incredibly ambiguous about whether it voids your warranty or not. I assumed they'd give me a flat out "no it voids your warranty" but it's a little more nuanced than that. Your telco's repair centre go by the repair procedures set out by the handset manufacturer, and not all manufacturers have a policy on it (they wouldn't go in to it further than that) and so in some cases rooting/romming your phone won't void the warranty. Of course I would recommend following the instructions at the end of this guide to take your phone back to stock before you return it just in case, but it's somewhat reassuring.
Hi there! Thanks for your feedback, glad you found the guide straightforward - enjoy the benefits of Root!
DeleteThanks especially for that update about Java, will certainly be helpful when troubleshooting others difficulties in the future.
In relation to warranty issues and Root, very interesting to hear the results of your enquiries. I agree with you that as a general rule returning the device to a stock state is the way to go, then at least there is no chance of falling foul of undeclared and variable policies around the issue.
Interestingly my phone's speaker has stopped working now so I need to get back to stock. I've also flashed CM9 RC2 since last week. To get back to stock could I just follow the unrooting guide here, or are there extra steps I need to take first?
DeleteSuccess! It turns out the problem was that I didn't wipe my dalvik cache when I installed Cyanogenmod. Now after unsuccessfully trying to flash back to stock I've managed to flash CM9 back on, and the speaker works along with a few other things I thought I'd just have to live with not working on CM.
Deletei have a problem i root'it my s3 but i forgot to make the back up, running stock firmware but yesterday i got a update CMW and SuperSU are still on my phone but rootit apps like sixaxes app dont work. so nou do i need to remove CMW and SuperSU and root again like in the guide or?
ReplyDeleteHi there, Are the SGSIII purchaced from telecom classed as the "international" version?
ReplyDeleteYes.
DeleteHi there, I see this is a dated guide now. Does this process still apply to Telecom s3's that are now running Jellybean 4.1.1? I am assuming when this was published ICS would have been the current version? Thanks, very keen to root and change rom.
ReplyDeletedude?
Deletei am downloading the root file but i can't get any .tar file there are two iso files in one folder and in on folder there are two iso's and one .bin file please can you give me the link of .tar file please
ReplyDeleteSame problem here, Windows 8x64
Deletei am imran from India can i root my galaxy note n7000
ReplyDeleteThe N7000 can definitely be Rooted, regardless of where it was purchased. I have not looked into N7000 modding for some time, I would think XDA-Developers will have a very user-friendly Root Toolkit available by now, I would check there.
DeleteHey is there any difference in rooting a S III and s S III LTE/4G?
ReplyDelete
ReplyDeleteHi,
I rooted my phone using your link above. I have a galaxy S3 LTE and since i rooted my phone, i cannot get any network signal on my phone. Is there anything you can suggest?
Regards
For some reason I dont get a .tar file I get disc image files?
ReplyDelete